Web-Based 3D Scene:
Setup in Blender
Introduction
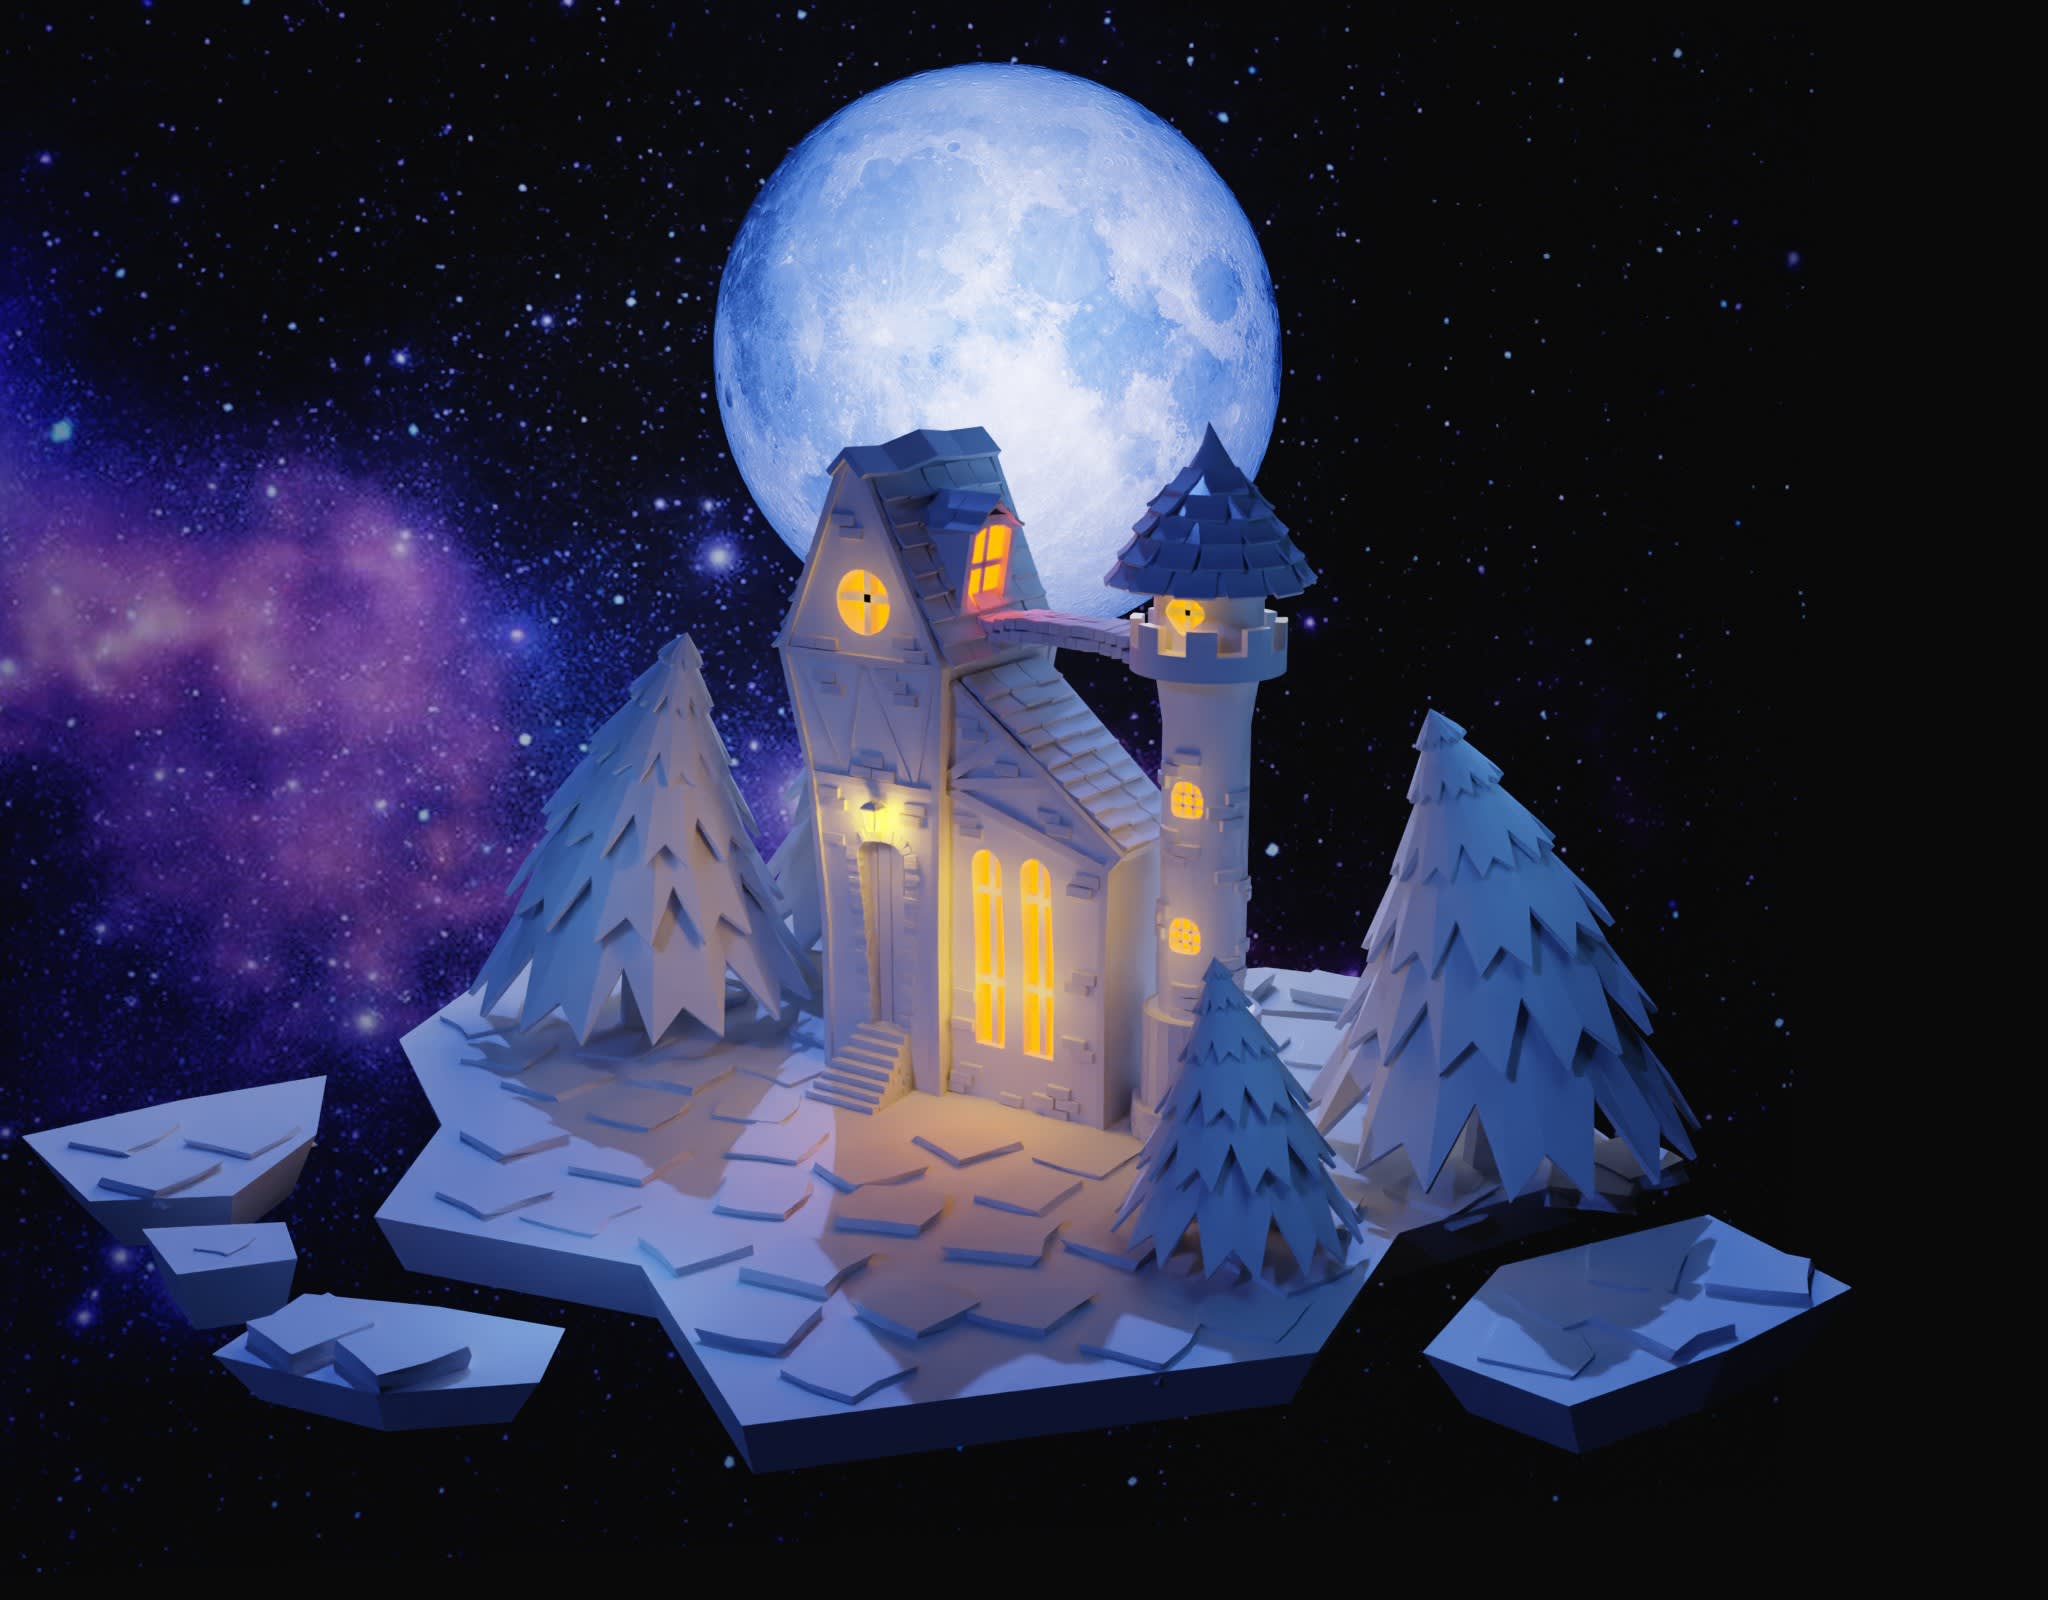
In this blog post we're setting out on a mission to optimise a 3D scene for a web application, using Blender. Our aim isn't to simulate physics effects, but rather to focus on quality and performance in our rendering. To achieve our goal, we'll handle all the rendering in Blender and export the resulting data as a baked texture. This approach enables us to simplify our web application to a single material, resulting in a significantly faster rendering process.
In this first part, we'll be walking you through selecting an appropriate model and optimising the scene in Blender. Our goal is to prepare a 3D scene that loads swiftly and efficiently on the web, ensuring a seamless user experience. It's helpful to have a basic understanding of Blender.
For this tutorial, I've prepared a 3D model for you to use, saving you the time and effort of searching for one. The scene we'll create is designed for one-sided viewing, which enables us to optimize the model more effectively by disregarding the non-visible part of the scene.
Tips where to find the model
In case you want to search for alternative 3D models to use in your project, consider websites such as Sketchfab, TurboSquid, Blend Swap and CGTrader. These platforms offer a wide variety of models, ranging from free to premium assets.
Ideally, you should look for models that are already optimized for web use, as this will significantly simplify your workflow. However, if you come across a more complex scene that requires optimization, follow this tutorial to learn the necessary steps.
Model overview
Upon initial inspection, the 3D scene we'll be working with may appear simple, but it is quite complex. To get an idea of its complexity, try exporting the scene and check the file size.
You'll notice that the exported file size is rather large, which is something we need to address first and foremost to ensure quick loading times.

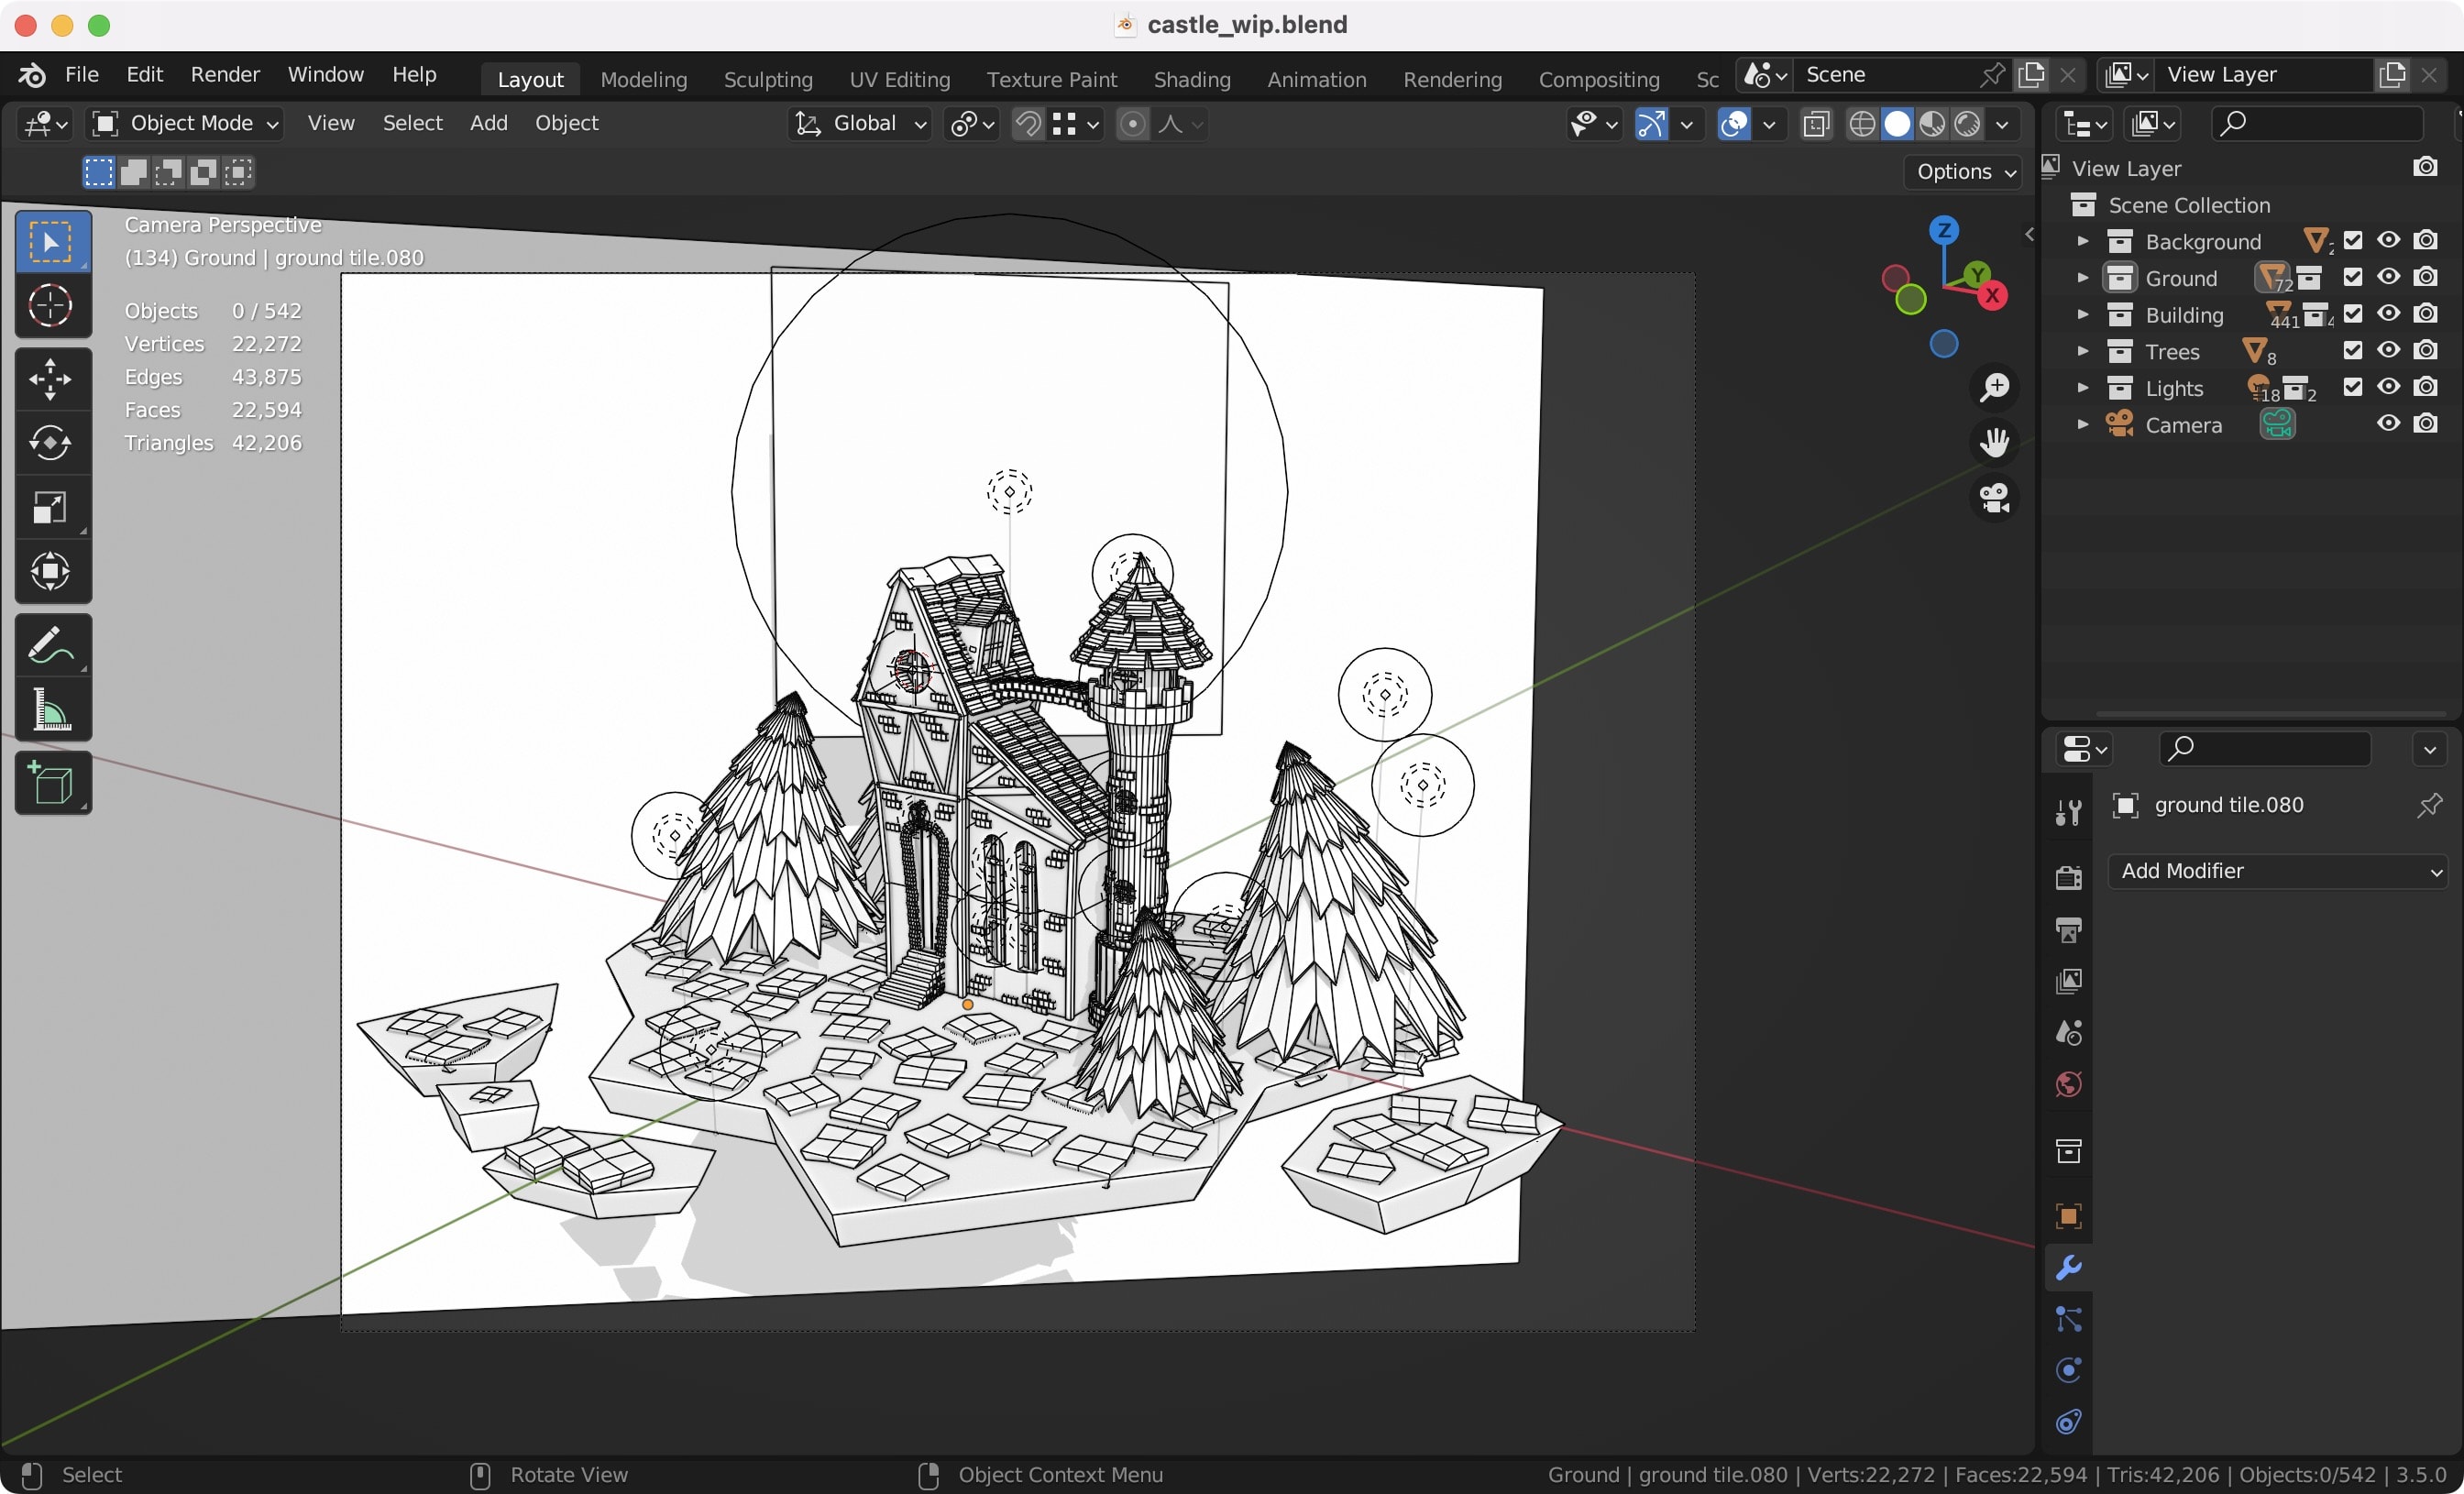
One of the main problems is number of polygons in the scene. As you can see the scene have over 42k triangles. This is a lot for a scene like this.
We can reduce the number of polygons and still keep the same shape of the model.
Optimising the scene
Let's start by optimising the scene and reducing number of polygons.
Removing unnecessary objects
First, consider how you plan to use your model and which parts will be visible to the user. This will allow you to remove unnecessary objects and simplify the scene. In our case, the plan is for the scene to be viewable from one side with a slight tilt/rotation. This means that most objects at the back won't be visible to users.
When removing objects, remember that these changes could affect lighting and shadows. In some cases, it's a good idea to replace a complex object with a simpler one or keep it in the scene to influence lighting and shadows but exclude it from the export file.


Removing modifiers
In Blender, modifiers are powerful tools that modify an object's geometry in a non-destructive manner. While they can enhance the details and capabilities of your scene, they can also significantly increase its complexity. Therefore, to keep your scene manageable and efficient, it's beneficial to remove unnecessary modifiers or apply them permanently to the mesh.
Keep in mind that modifiers cannot be directly exported. That said, they can be automatically applied during the export process, so it's not always essential to apply them beforehand. However, applying modifiers can make the model easier to work with, and it can further streamline the mesh for optimal performance.
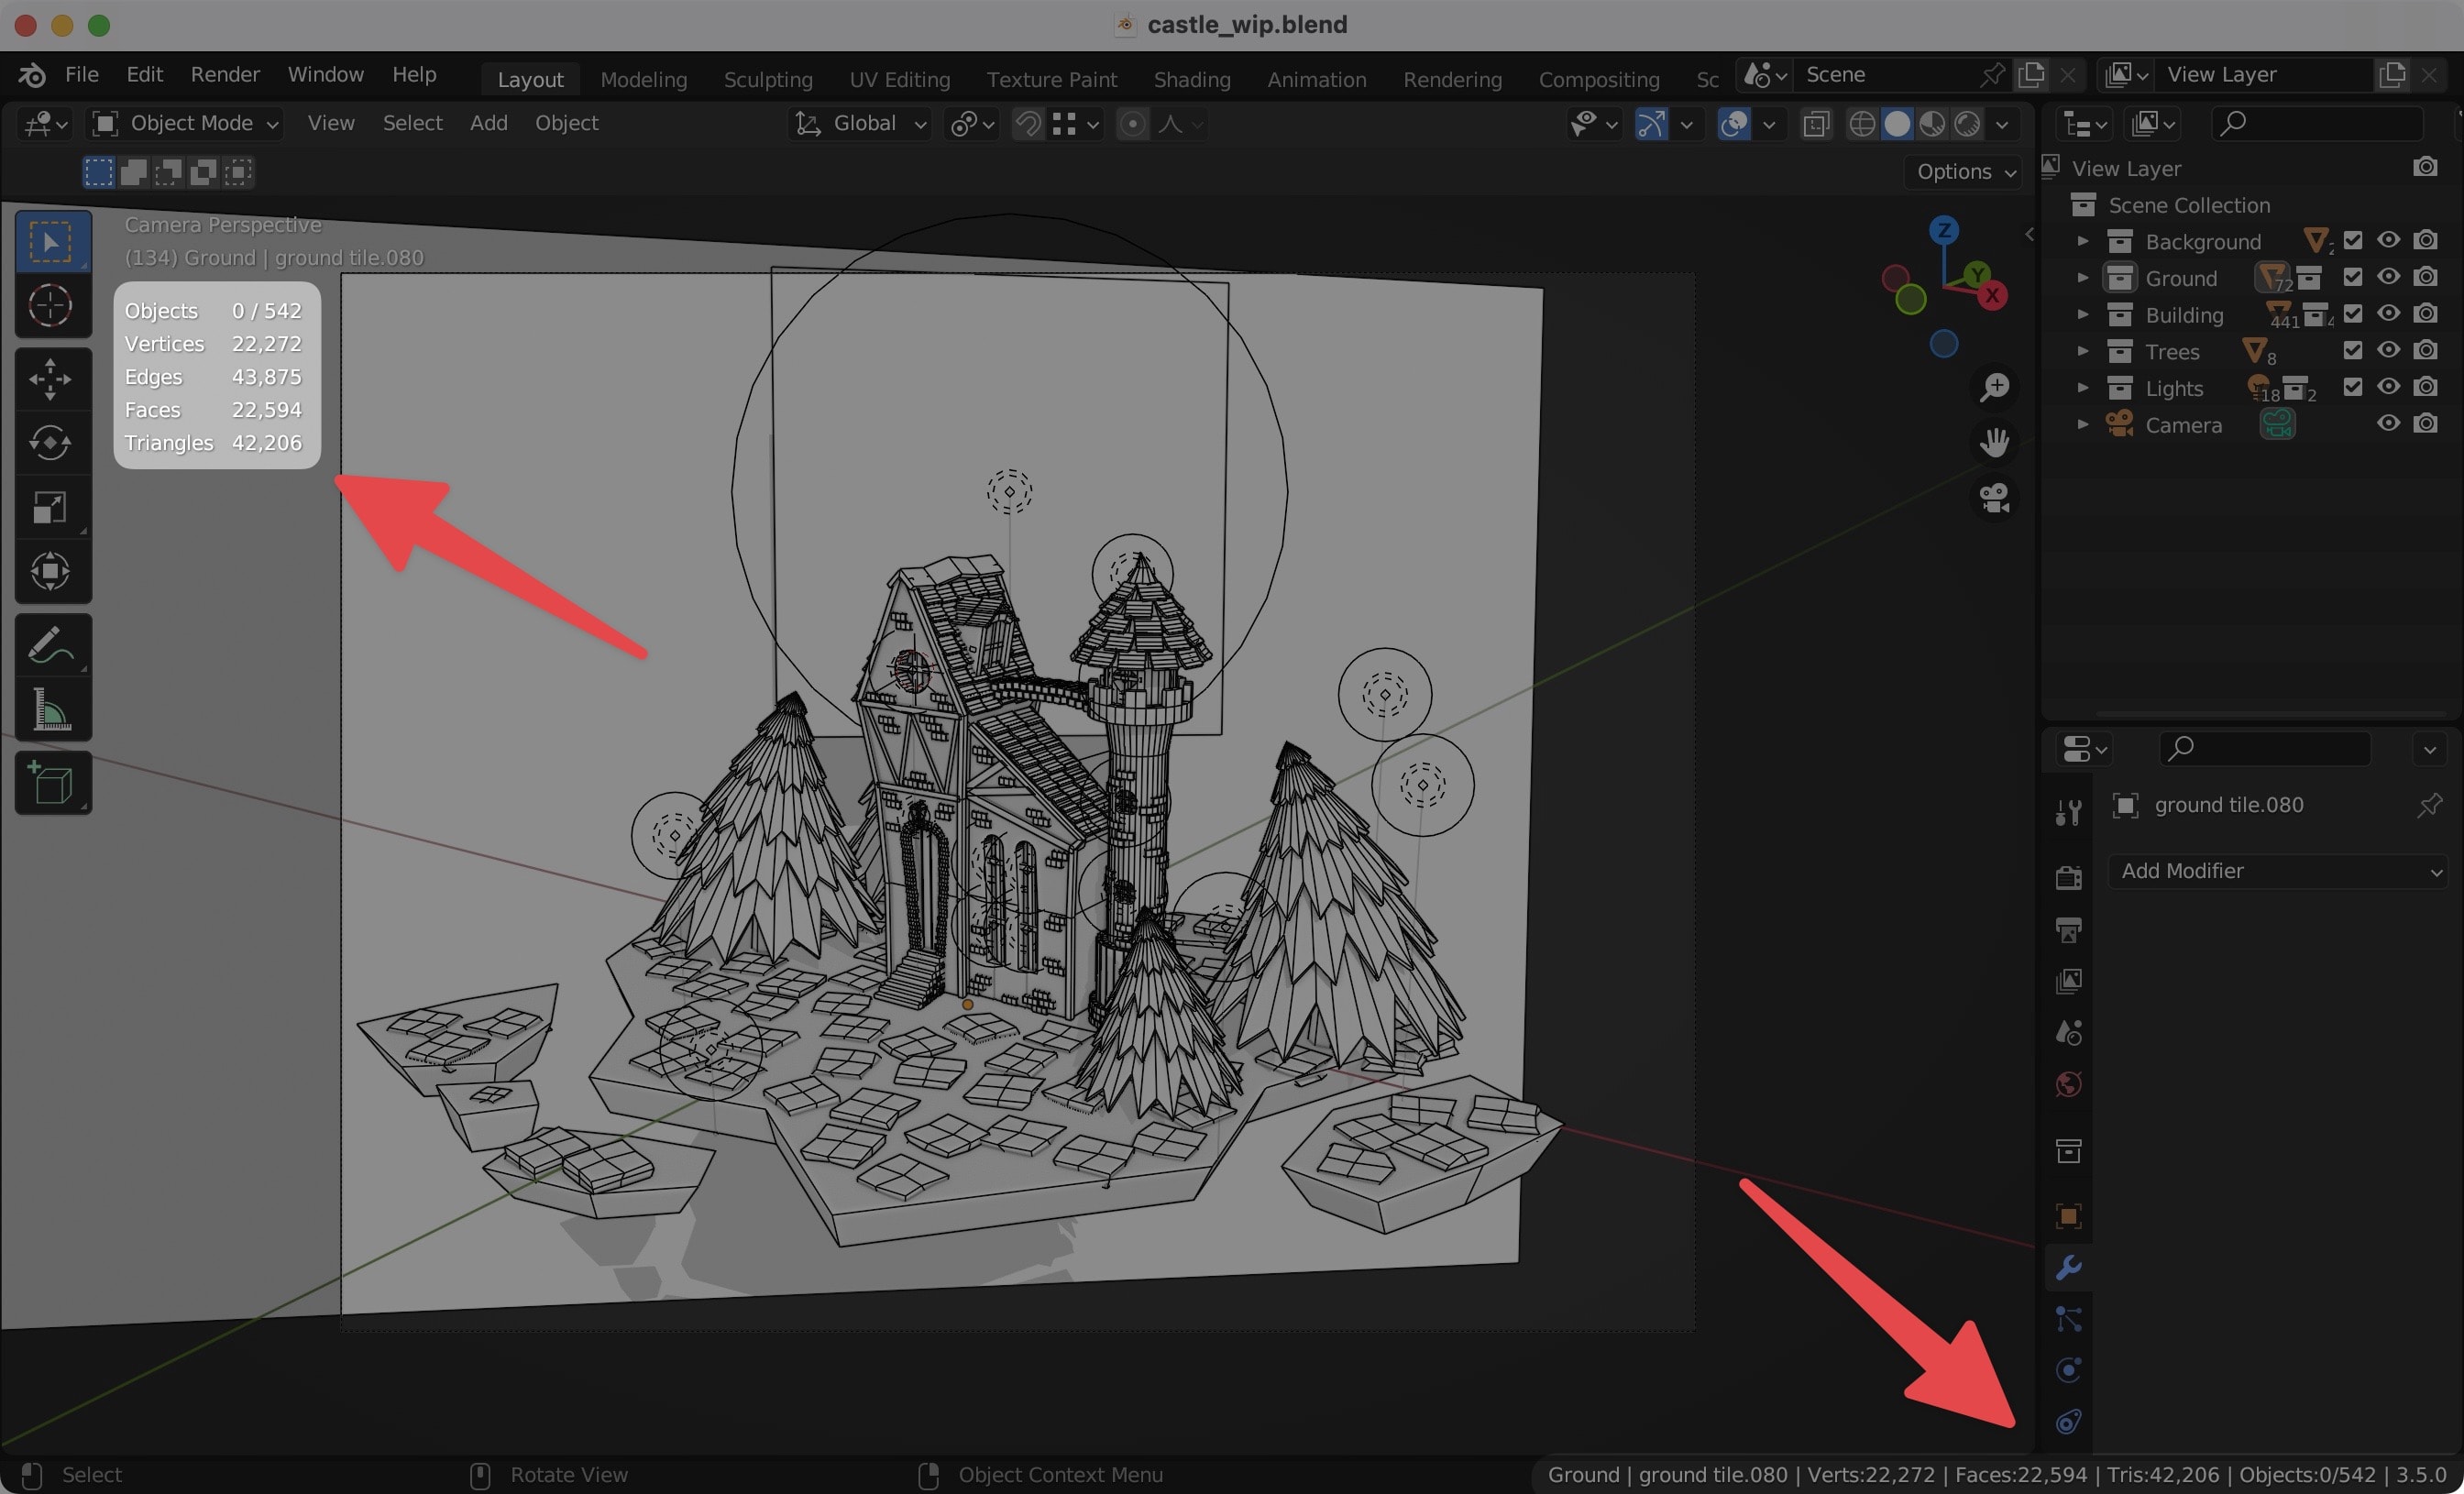
Modifiers can be easily identified in the three views of our scene.
In our scene, we are dealing with three types of modifiers:
Solidify
The Solidify modifier adds depth to the object. For our model, this modifier is necessary, so we're going to keep it.


Simple deform
The Simple Deform modifier is typically used to bend the object. In most cases, this modifier is applied to retain the bend in the object. However, in our specific scenario, we can safely remove it. We'll then manually add and potentially animate the bend using Three.js.
Bevel
This modifier adds a bevel to the edges. In some cases, you can remove this modifier or reduce the number of segments. In our case, the bevel is applied to wooden planks and bricks, which are relatively small compared to the preview, so we can likely remove it
When evaluating your scene's modifiers, it's helpful to set up a Blender preview that mirrors your desired end result. By toggling the modifiers on and off within this preview, you can observe the influence of each modifier. This makes it easier to decide which ones enhance your scene and which ones could be removed.
Decimate modifier
Sometimes, you may come across models with complex meshes that cannot be easily optimized by merely removing the modifiers. In such cases, you can use the Decimate modifier to reduce the number of polygons in the model. The Decimate modifier allows you to decrease the vertex/face count of a mesh while minimally affecting its overall shape.
In our scene, even after the removal of all modifiers, some meshes, like roof tiles, bricks, and wooden planks, remain relatively complex. We can further simplify these using the Decimate modifier.
To utilize the Decimate modifier, select the desired object, and then add the Decimate modifier.
Three options allow you to adjust the mesh: Collapse, Un-Subdivide, and Planar. Collapse and
Planar are the most frequently used and can offer the best results. Experiment with these to
achieve an optimal outcome.


Manual editing
For more complex models, manual editing may be necessary. This method involves removing extra vertices, edges, and faces while maintaining the overall shape of the model. Fortunately, in our case, we were able to avoid most of the manual editing by effectively using the Decimate modifier. This reduced complexity and optimized the model, saving us time and effort.
Removing invisible faces
Another efficient way to optimize your scene is by removing faces that aren't visible to the camera or viewer. This step differs from our previous discussion on whole objects. Here, the focus narrows to individual objects and their specific polygons. Besides further reducing the number of vertices, this step also simplifies the UV mapping process and helps conserve valuable texture space.
Luckily, some of our meshes are linked together, which streamlines the editing process. For instance, editing one brick applies the changes to all the bricks in the scene, saving considerable time and effort.


Before proceeding to the next step, it's important to apply all the modifiers. This ensures that we're working with the simplified meshes when we transition to the UV editor.
UV unwrapping
To bake textures, a UV map is required for each object. This process, known as unwrapping, translates the 3D model onto a 2D texture canvas.
Preparing the texture
Before we dive into unwrapping the UVs, it's essential to assign a material to every object in the scene. Each material must also have an associated texture. This texture will be instrumental when we bake the texture from the high poly model to the low poly model. In our case, all models have a single material, simplifying this process.
Begin by creating a new image texture in the UV Editing view 1. To do this, click
Image > New 2. Set the size to 2048x2048 3, select UV Grid
4 for Generated Type, and then click OK. This image will serve as the blueprint for
the UV unwrapping process. We're assigning the UV Grid so that we can quickly assess the layout of
the UV map.


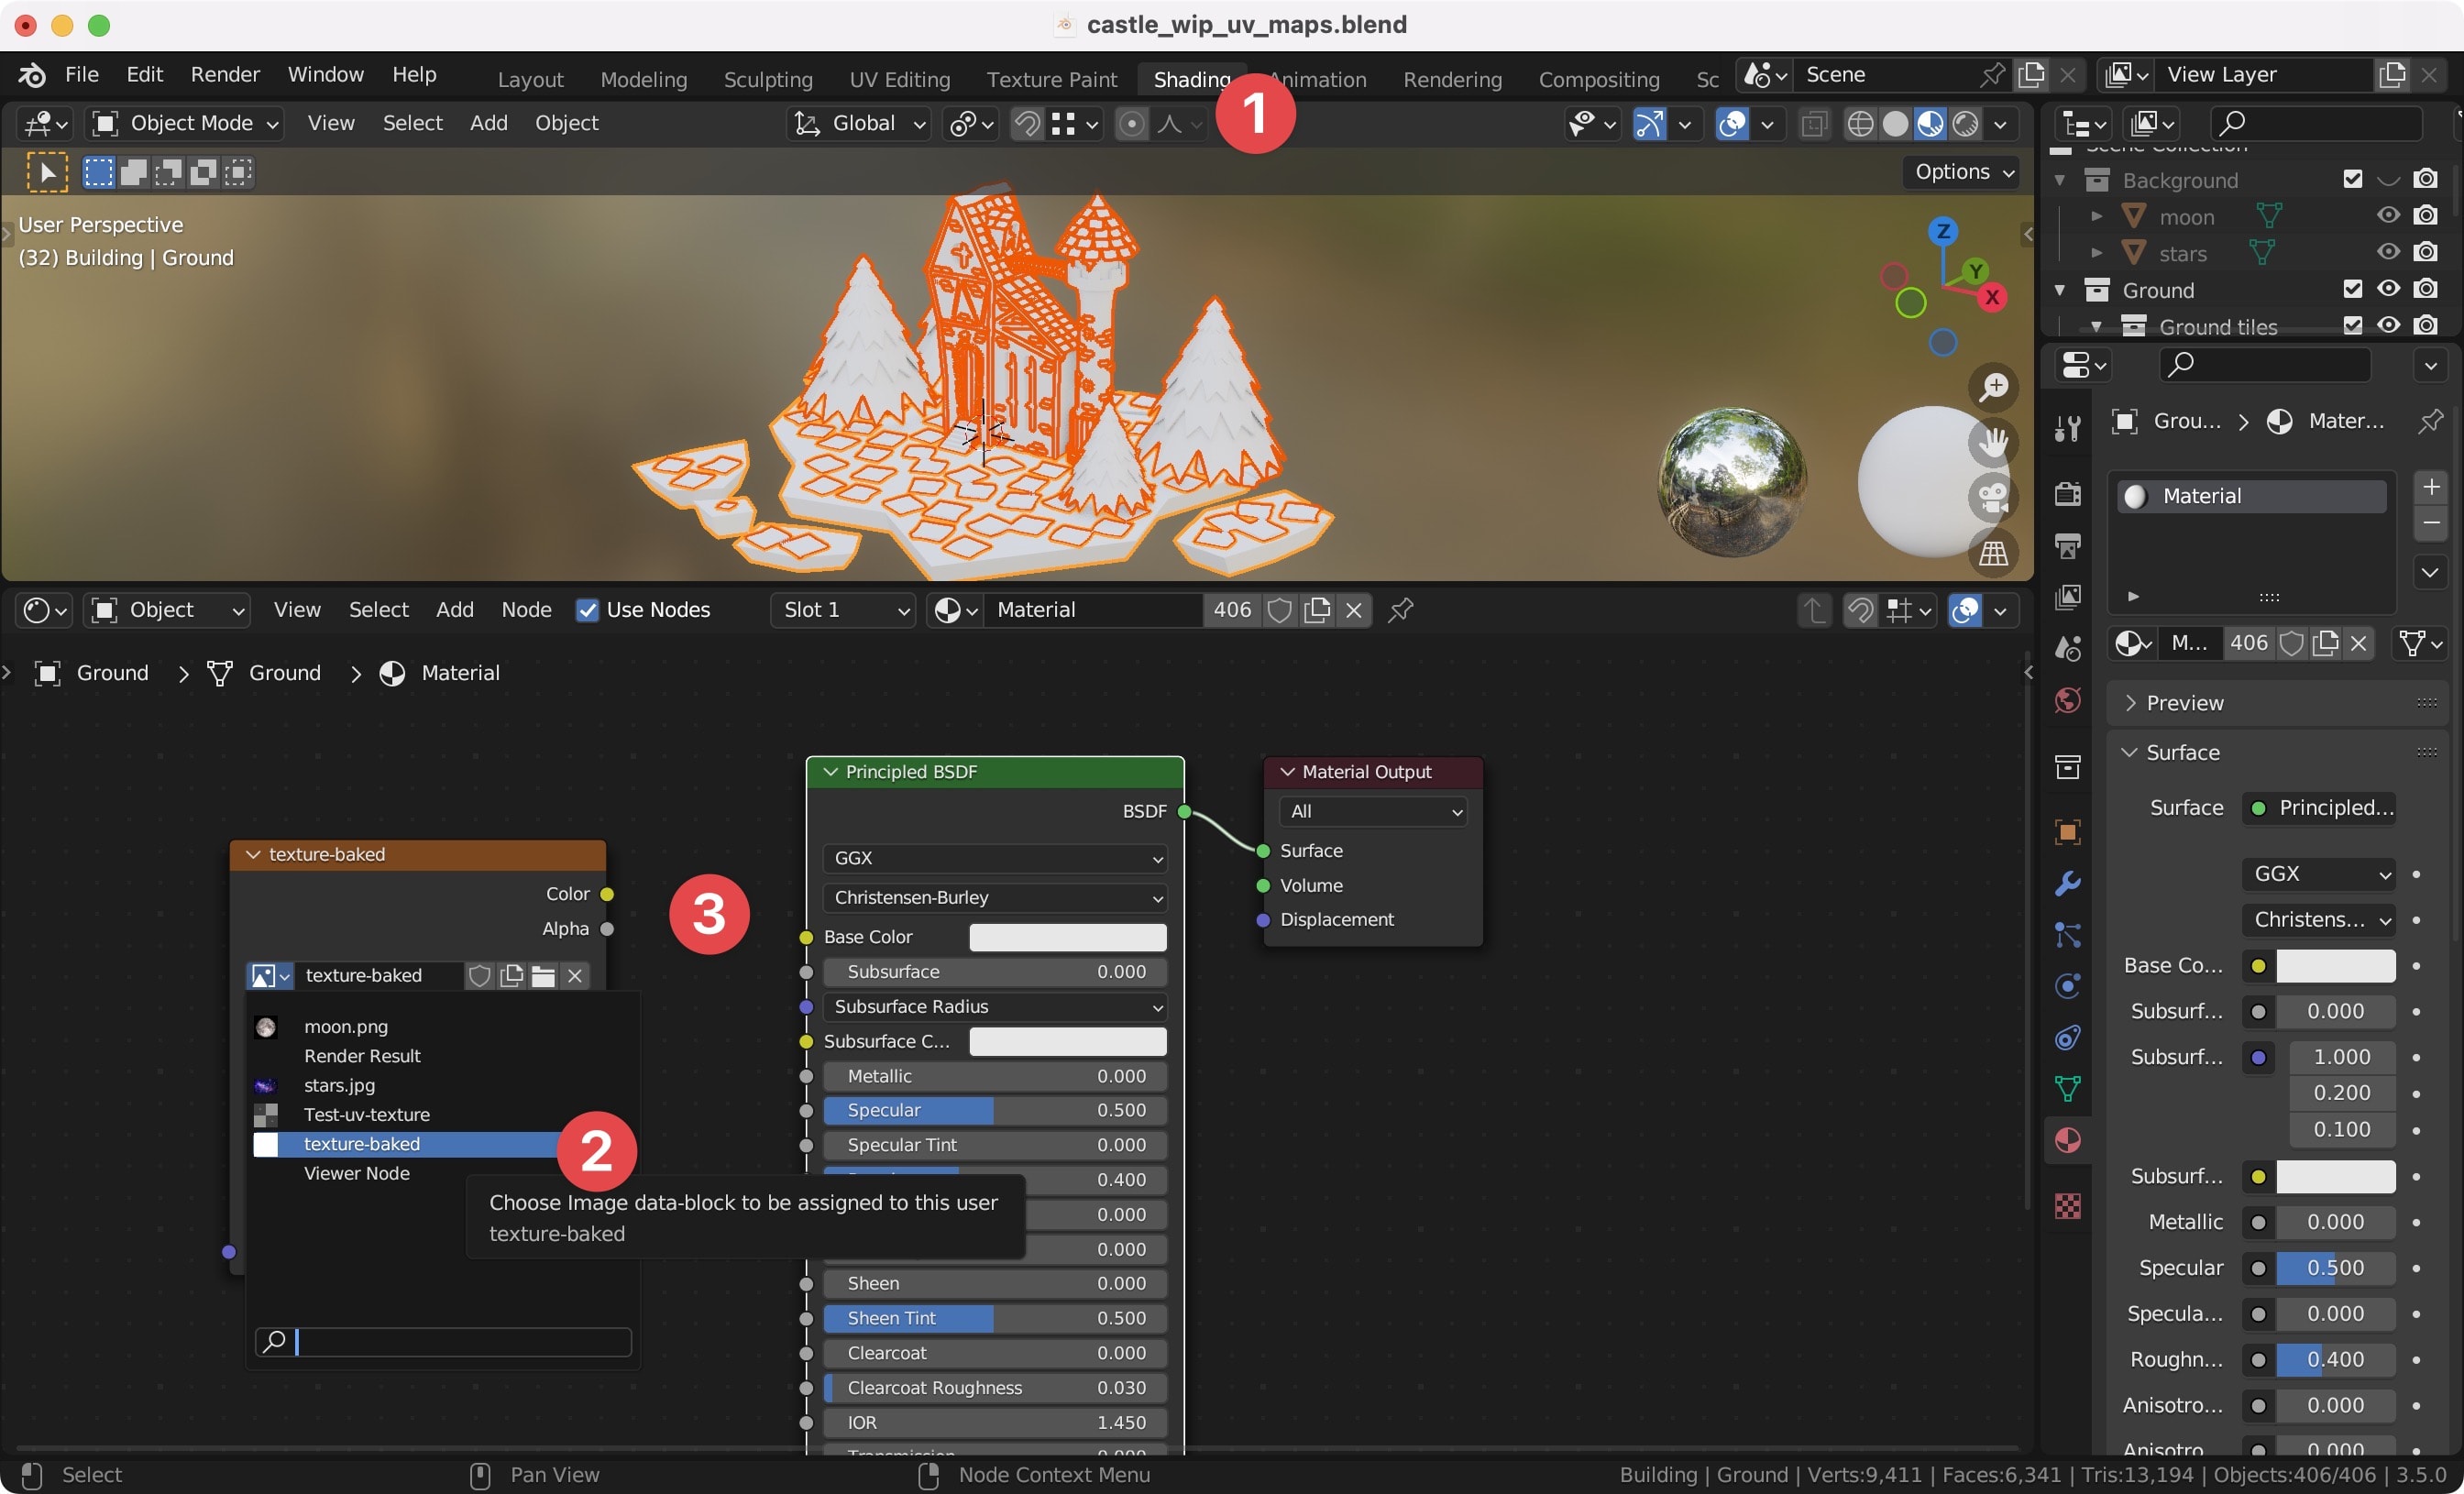
Next, assign the texture to the material. Switch to the Shading view 1 and select
the material 2. Add a new Image Texture node 3 and connect it to the
Base Color 4 input of the Principled BSDF node. Finally, select the texture
5 we created in the previous step. This links our newly created texture to the
model's material, setting the stage for efficient texture baking.


Unwrapping
You have the option of manually cutting seams in your mesh or using Blender's Smart UV Project
feature to automatically generate a UV map. From my experience, manually cutting seams often yields
better results. However, this method requires a bit of experience and familiarity with the process.
Fortunately, there are numerous online tutorials available that can guide you through this task.
Now let's explore the unwrapping of various elements in our scene to better understand the process.
We'll need to switch to the UV Editing view. Then, select an object and enter Edit Mode. This
mode gives you the freedom to manipulate individual vertices, edges, and faces, which is crucial for
effective UV unwrapping.
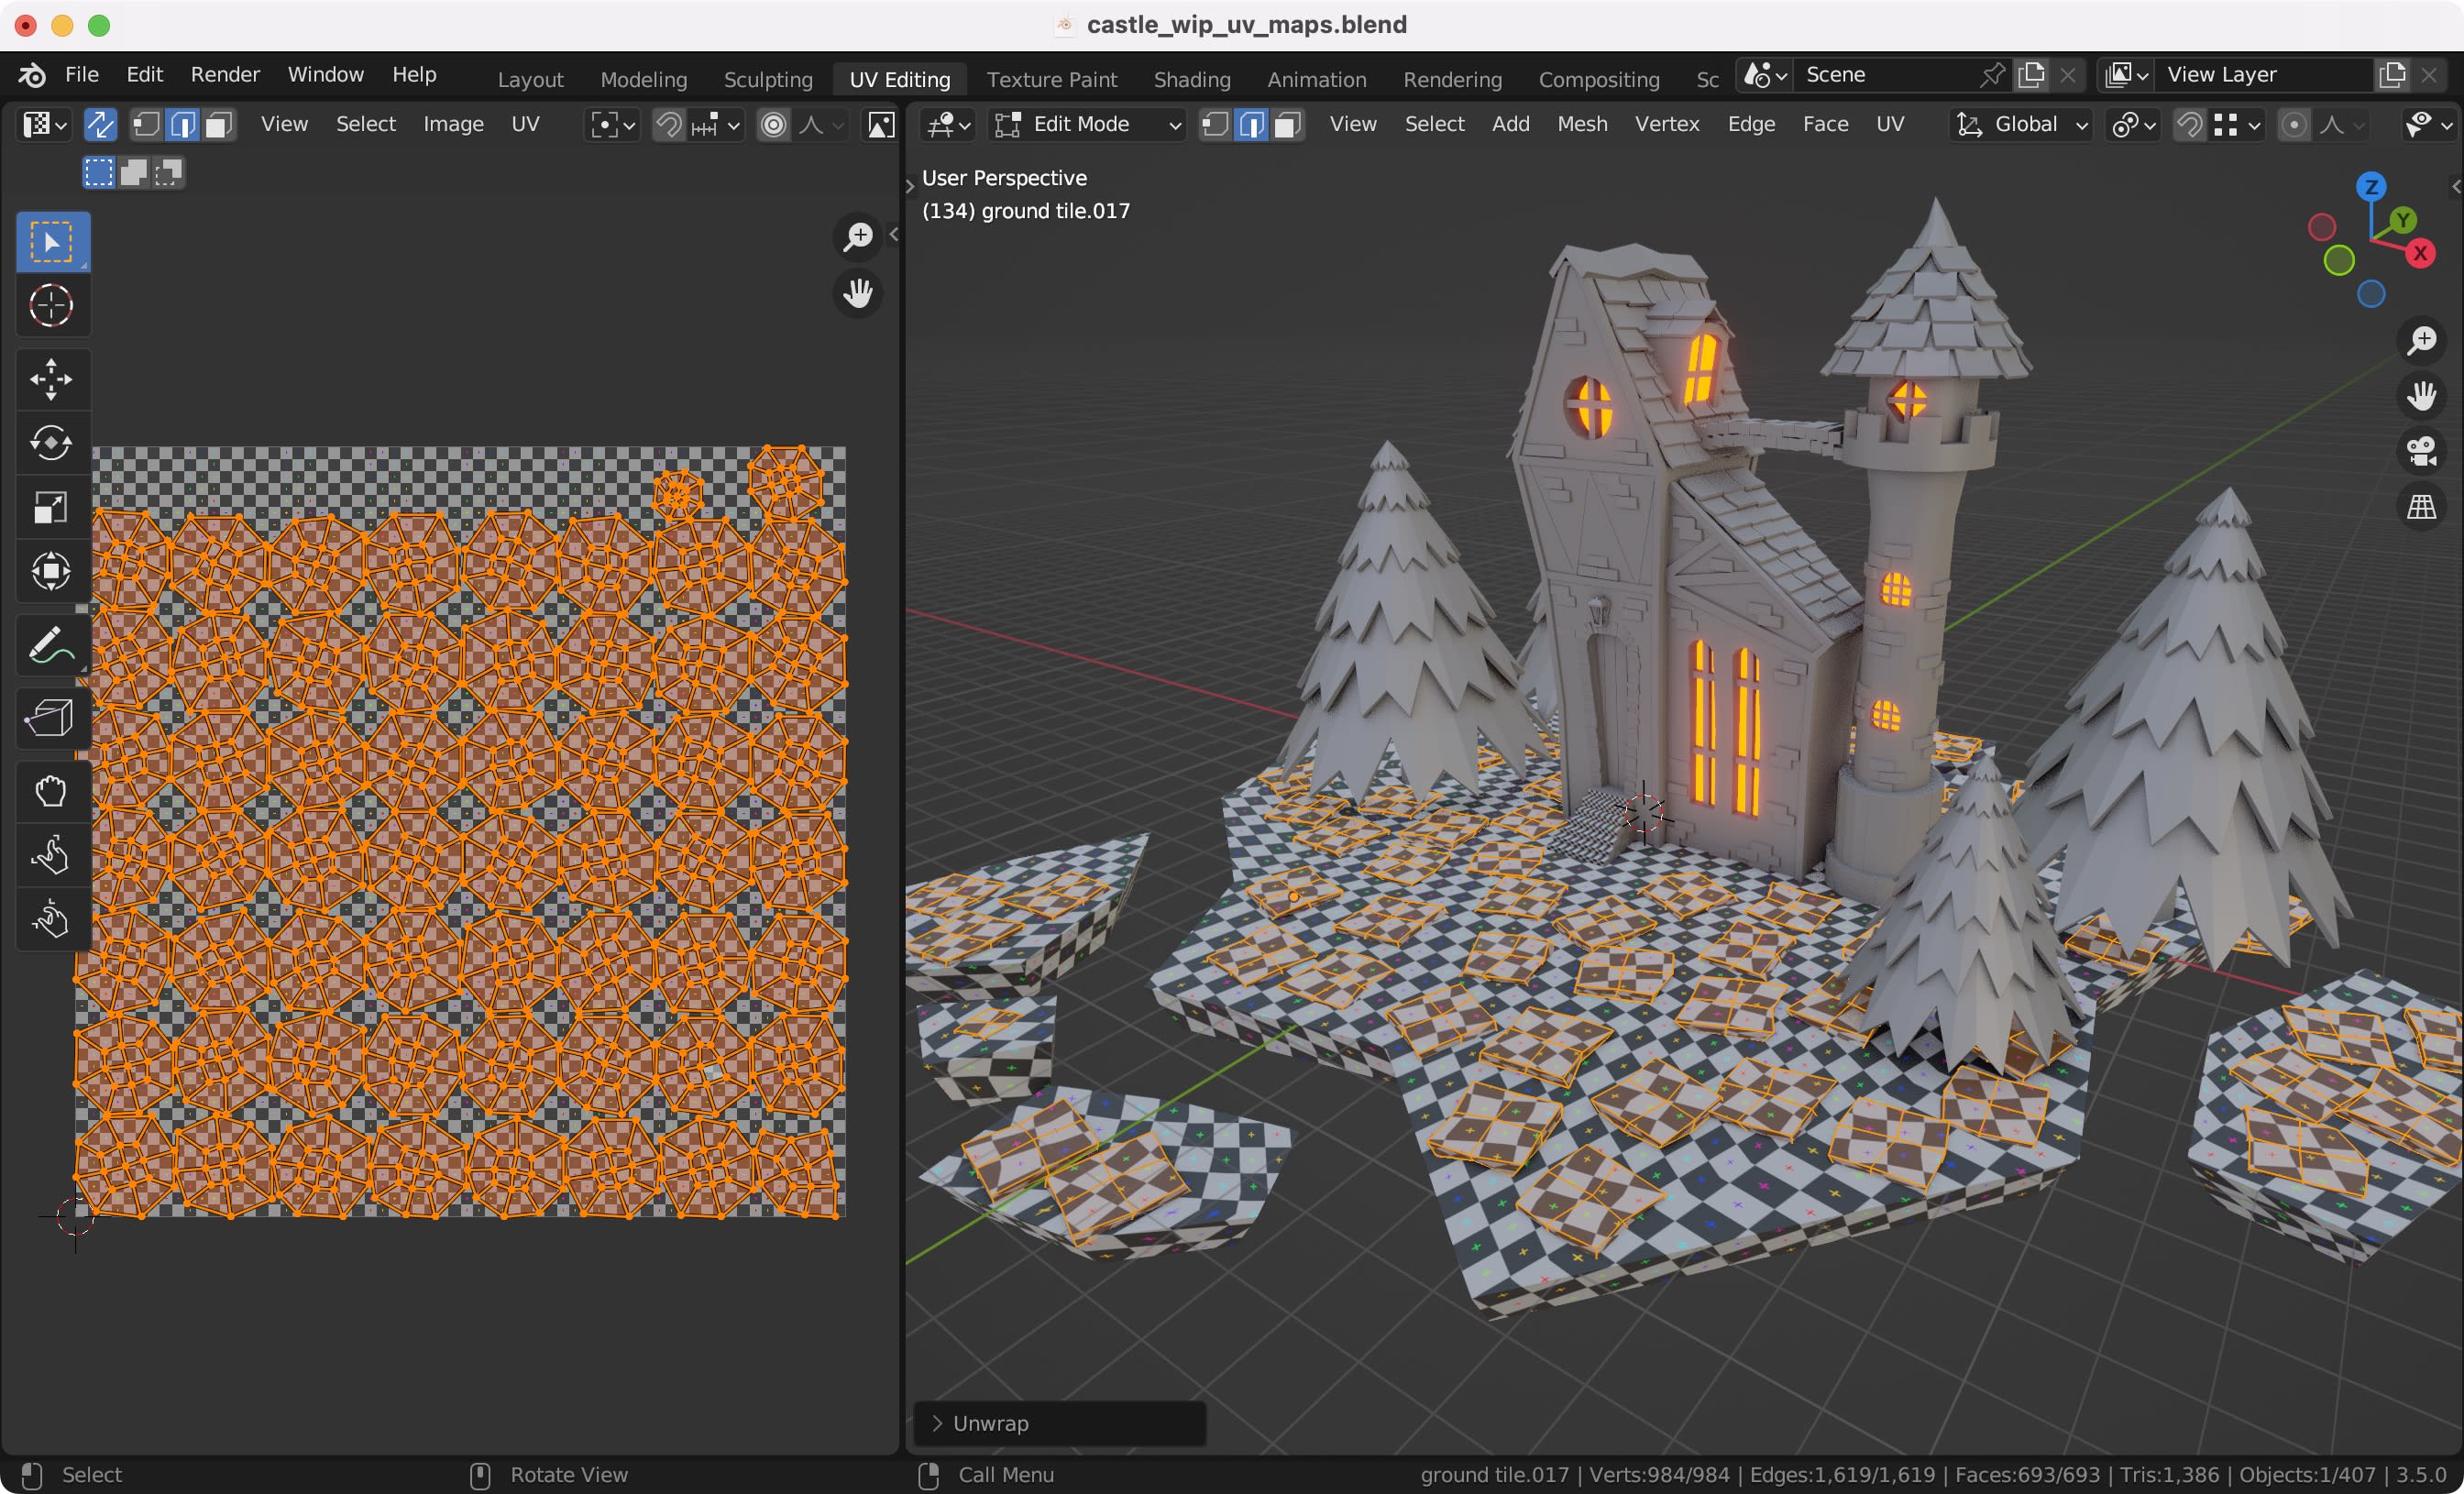
Ground
Begin by selecting the ground object, then switch to Edit Mode and select all its faces. Press
U and choose Unwrap.
Upon observing the scene preview, you'll notice areas where the texture appears stretched. This distortion results from an imperfect UV map. We can optimize the UV map by creating seams in the mesh. Let's try to cut seams at the corners of the ground and then unwrap it again. It's advisable to add seams near regions where the texture is stretched and in areas where the seams are less likely to be seen.


Next, let's unwrap the ground tiles. Select the object, switch to Edit Mode, and select all its
faces.
On inspection, the texture appears quite acceptable; there's minimal distortion. Given this, we can leave it as is and proceed to the next object. The aim is to optimize where necessary, without overcomplicating the process.
Trees
Select one of the tree objects and apply the unwrapping process. You'll notice that the default unwrap is quite good, although it could benefit from additional seams for further optimization.


Building
Now, let's turn to the building. We'll begin with the bricks. As all the bricks are linked, we only need to unwrap one of them, and the changes will apply across the board.


Next, we'll tackle the wooden parts of the building, starting with the wooden beams.


Remaining
The previous steps should have given you a sense of the process. I'll briefly go over the rest of the model and focus on presenting the final results. You'll find a link to the Blender file with all seams at the end of this tutorial. This can help you understand where and how to position seams for optimal UV unwrapping outcomes.


Final steps
Before proceeding to the next step, we need to unlink all objects in our scene 1. This will enable us to assign a different part of the UV map to each object. Please note, this means objects in our scene will no longer share mesh data, which could complicate any further editing. If you anticipate future adjustments, it may be a good idea to duplicate your model and hide it in the scene for later use. We should also apply scaling to our objects in the scene to simplify the scaling of our UV maps 2.


Baking
Now lets move on to baking our scene.
Preparing the texture
To start, let's create a new texture for baking. As before, navigate to UV Editing, select
Image > New Image 1 and adjust following settings 2:
- Set the
sizeto 4096x4096 - This should provide sufficient resolution for our scene, and we can always scale it down later if necessary. - Set the
colorto white - Occasionally, the background color may show up in the baked map, so it's preferable to use a color that will blend with the scene. - Select
32-bit Float- This will allow us to bake the scene with high dynamic range.
Once you've created the texture, you should save it to a file. Go to Image > Save As Image
3 and save the texture to a file as an HDR (high dynamic range) 4,
and store it in the same folder as the Blender file. Saving the file as an HDR and using a 32-bit
float texture will allow us to bake textures with the highest possible quality, which we can then
convert to PNG or JPG.


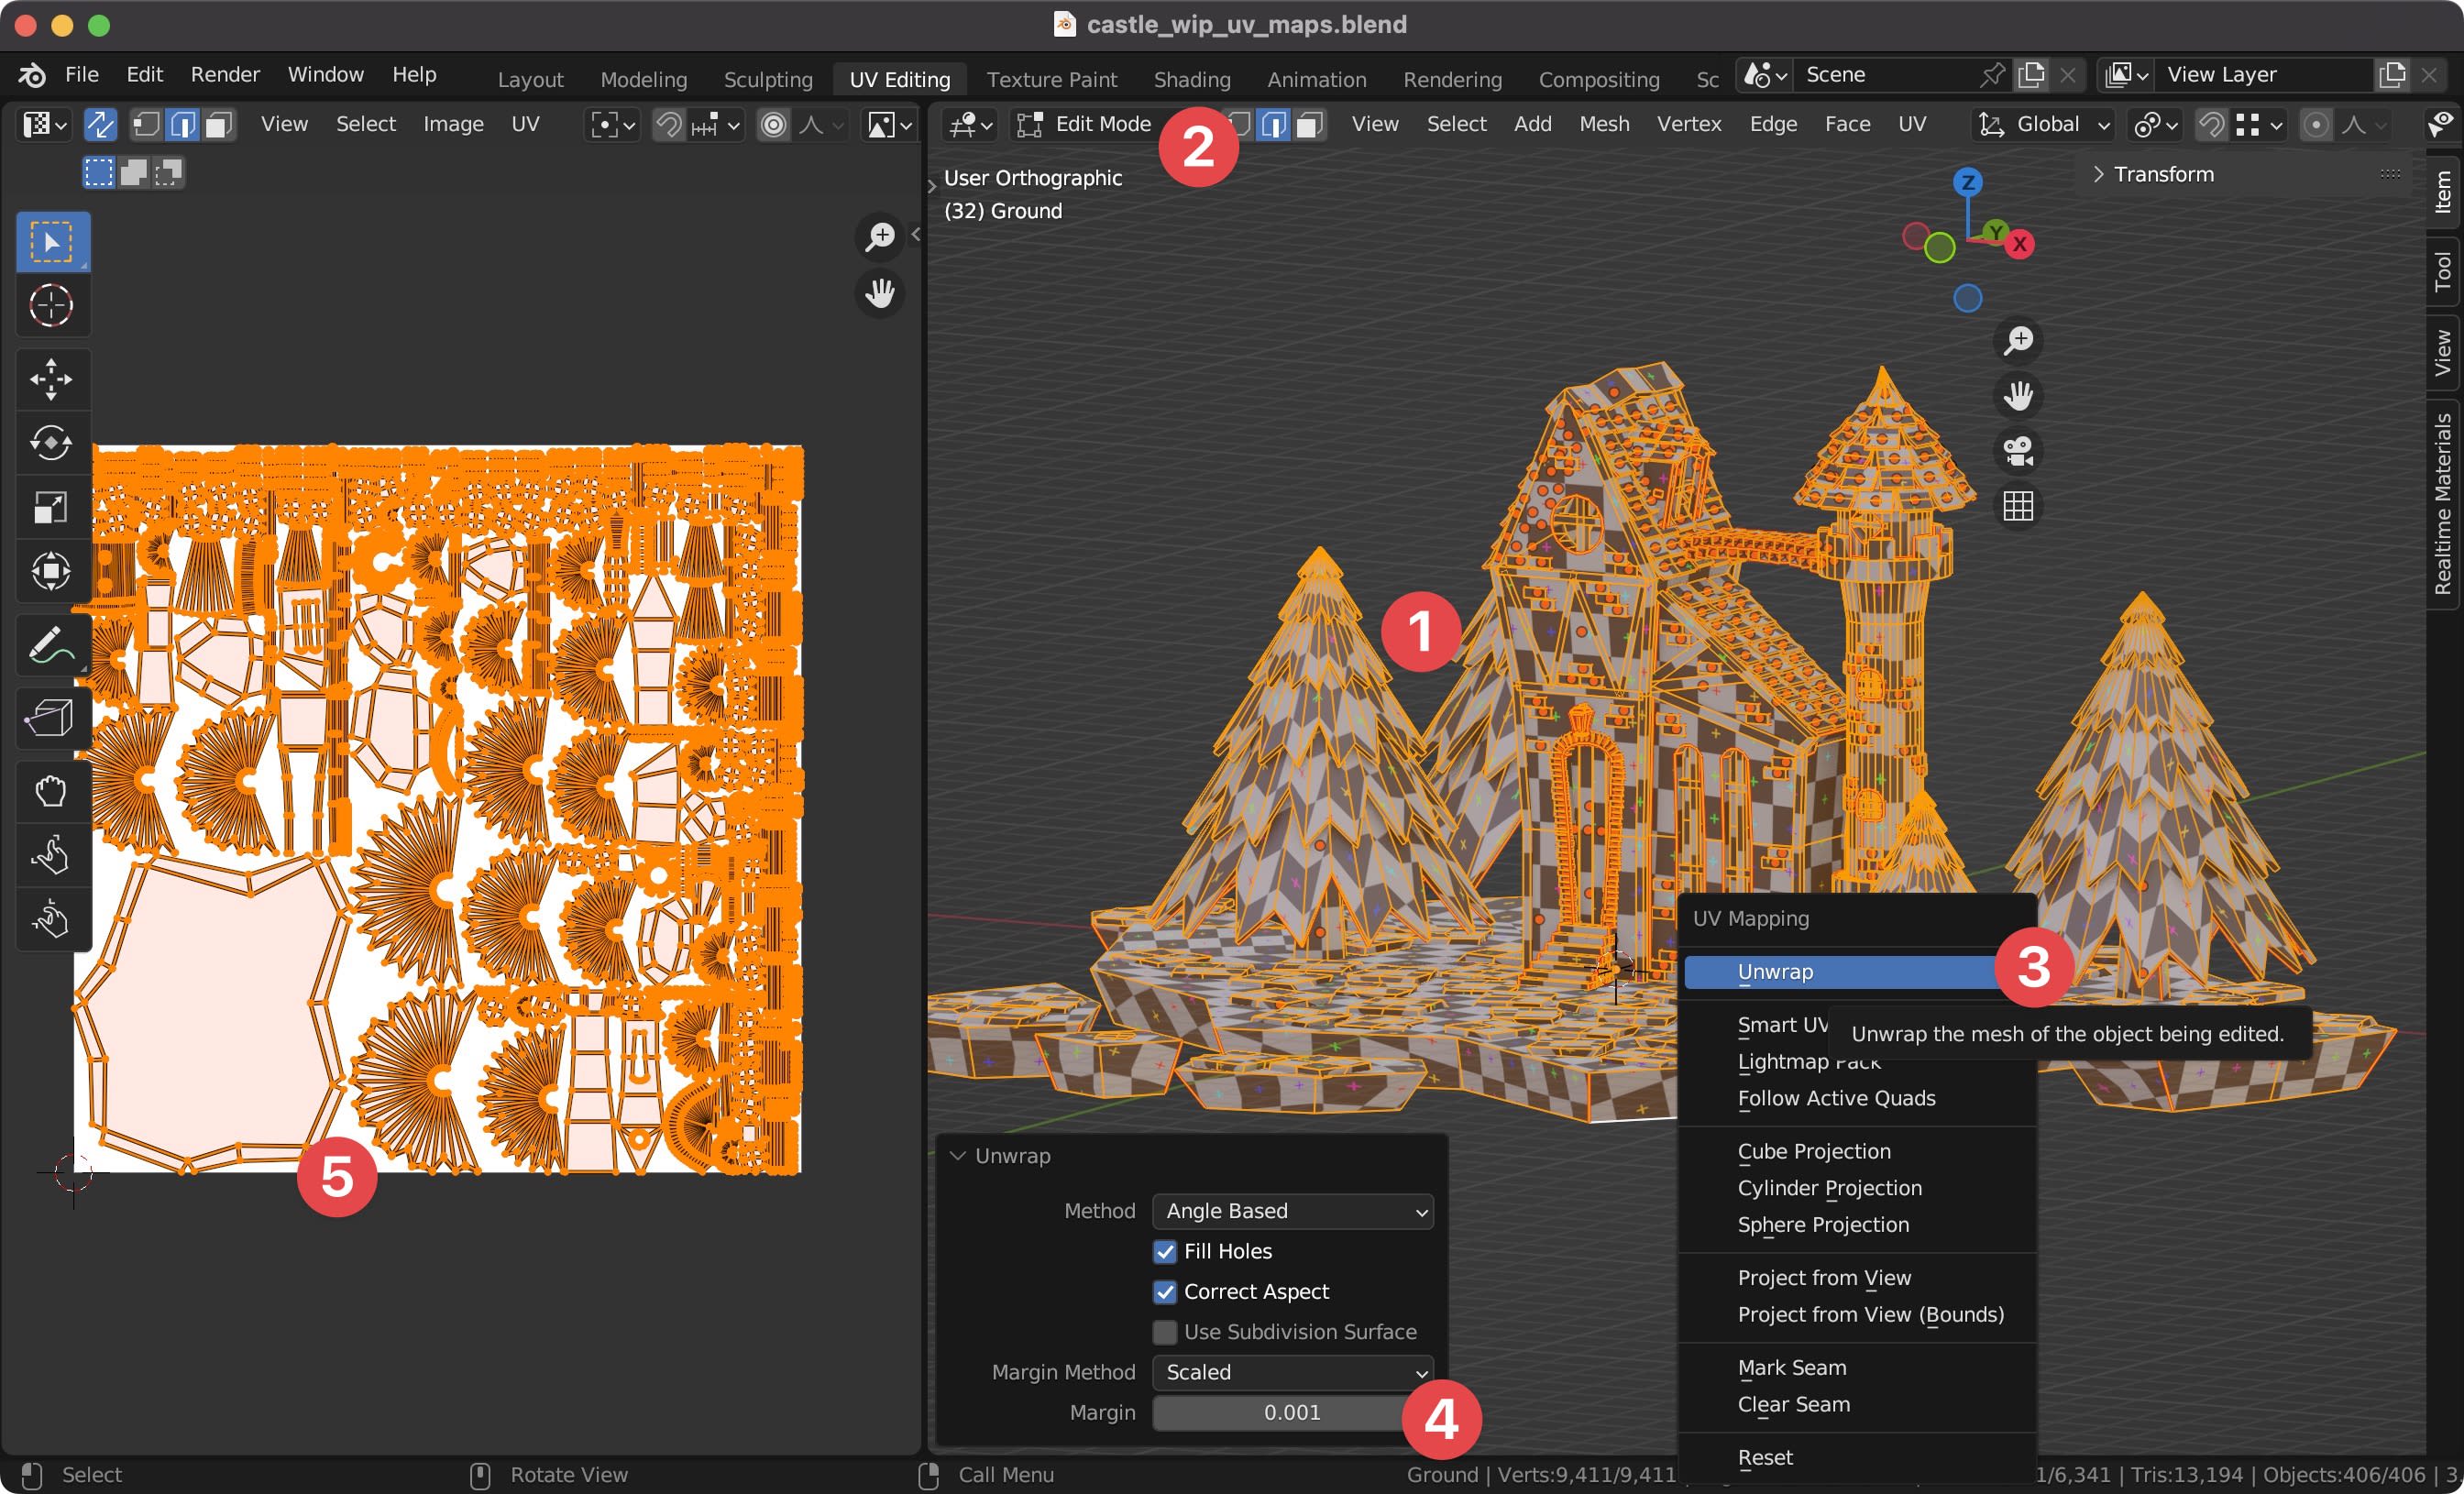
Now we're ready to unwrap our entire scene. Select all objects in the scene 1, switch
to Edit Mode 2, and press U to unwrap all the elements 3.
You should also add small amout of margin to avoid textures bleeding into each other
4. This should unwrap all the elements in such a way that there are no overlaps
Finally, we need to update the texture 2 in the Shading tab 1. We
should also unlink the texture from the material 3 to ensure it doesn't impact the
final render.
Baking the scene
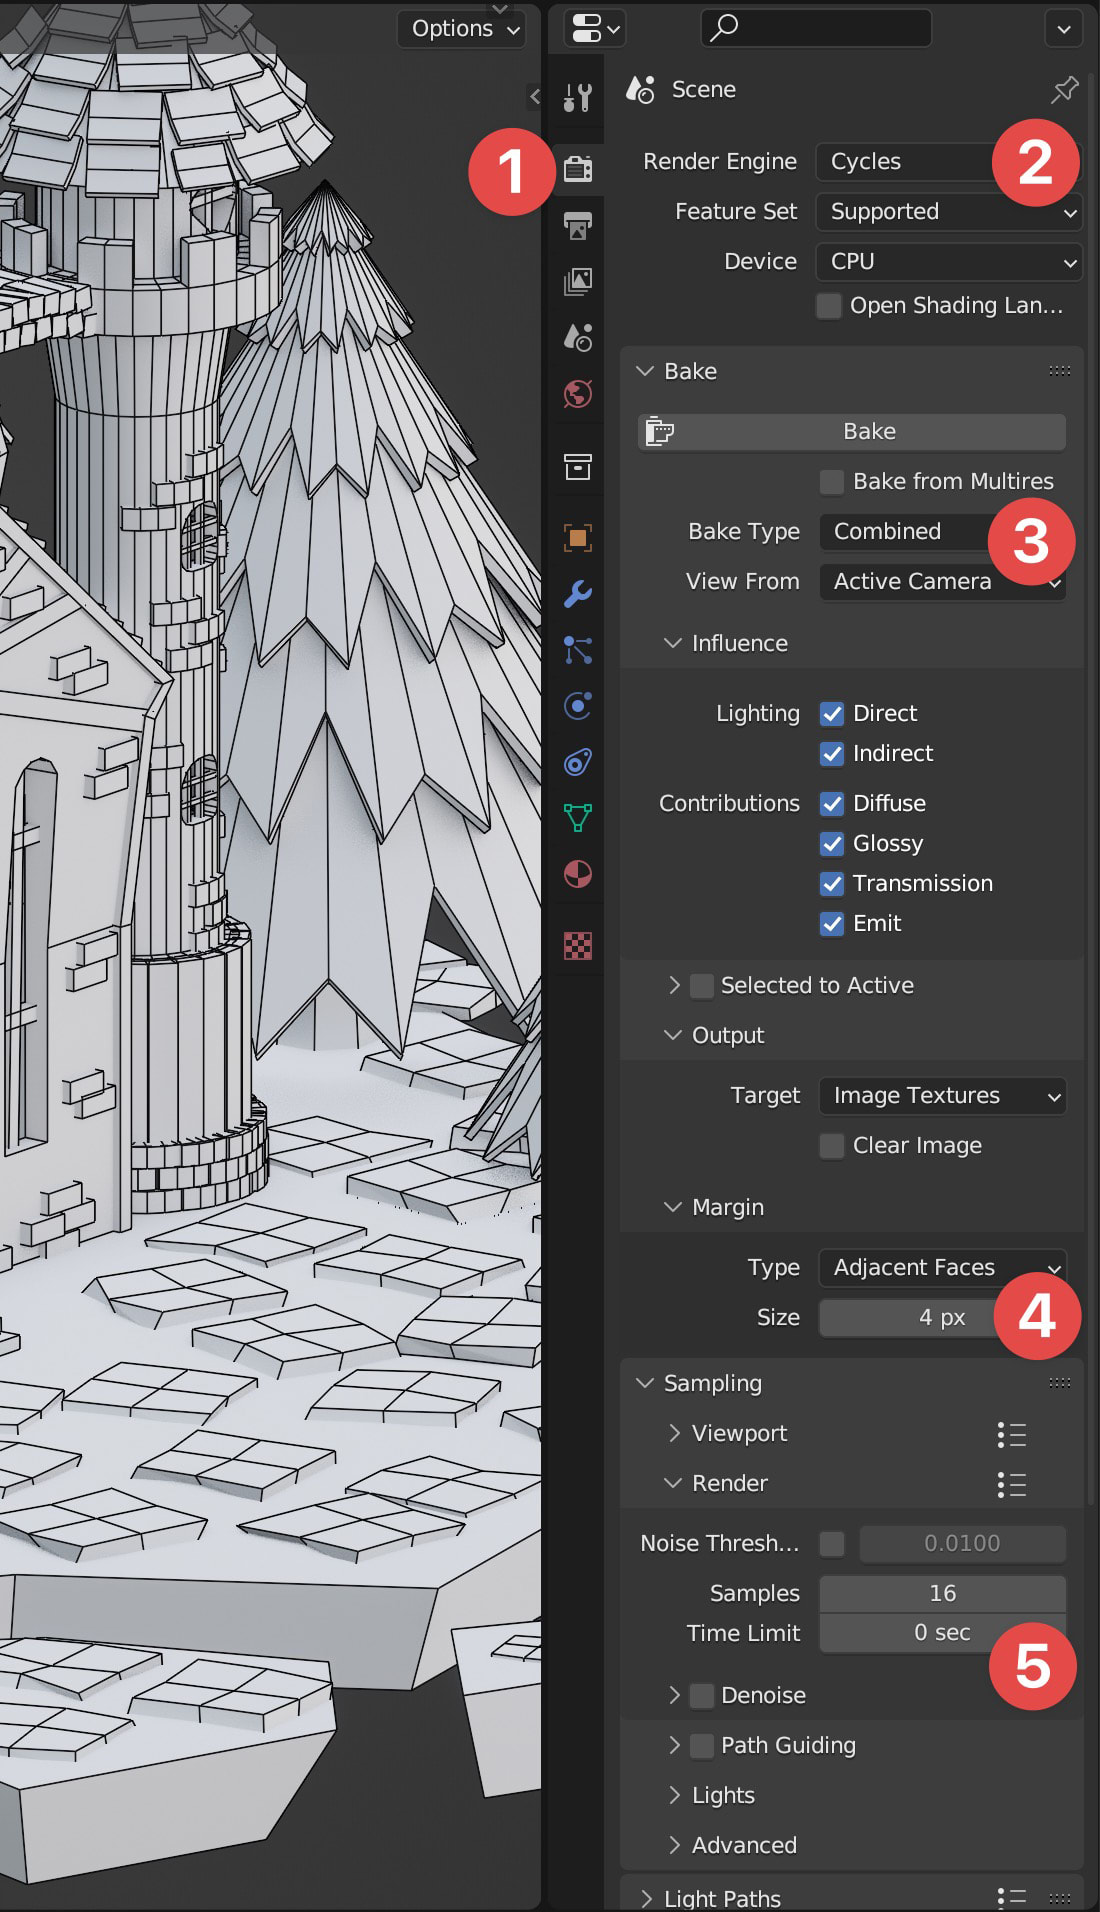
Switch to the Render Properties tab 1. Before we start baking, let's discuss some
of the settings:
Render engineCycles 2 - Currently, this is the only render engine that supports baking.Bake typeCombined 3 - This will bake all visible information into a texture.Margin4px 4 - This will add a margin around the UV islands to prevent bleeding. The size of the margin depends on the space we have between the UV islands.Clear imagedisabled - This will prevent the texture from being cleared before baking. It is also useful if you want to split the baking into multiple steps.Sampling5Samples16 - In simple terms, this defines the quality of our bake. The higher the number, the better the quality. However, a higher number will take longer to bake. If you have a powerful machine, you can select higher values.Denoiseoff - Denoising helps reduce the noise caused by low sampling. In our case, we'll handle denoising in post-processing, which will be much faster, so we can disable this property.
Now, simply click Bake and wait for the results. This may take a while depending on your hardware.
If everything went well, you should see the baked texture in the UV editor.
To verify the result, switch to the Shading tab 1, change the preview to
Material preview (by pressing z) 2, and connect the baked texture
directly to the Material Output node 3 (we no longer need the material node).


Denoising
As previously mentioned, we've disabled the denoising as part of our bake. Now let's denoise the
texture in post-processing. To do this, we'll use the Denoise node in the compositor. Switch to
the Compositing tab 1, select Use Nodes 2, then add an Image
node 3 and select our baked texture 4. Next, add the Denoise node
5 and connect them as shown below. You also need to disconnect and disable the
Render Layers node, which you can do by selecting it and pressing M 6.
Before we run the denoising, we need to change the output size to match the size of our texture
7 . Switch to Output Properties and change the resolution 8.

Finally, you can press F12 (or go to Render > Render Image).
Once the render is finished, you can save the image as a JPG by going to Image > Save As Image.


As you can see, almost all the noise is gone, and the texture looks much better.
Exporting the scene
We've finally reached the last step of this tutorial: exporting the scene.
First, let's ensure we're only exporting the scene models, without the background (we'll add the background in three.js), cameras, and lights. Next, I usually duplicate all the elements in the scene (with Shift + D), merge all the models into one mesh (Cmd + J), and add them to a separate collection. Merging all the models together will make the model much more performant in Three.js and easier to work with.


Now we can export the scene. First, ensure that only the merged model is selected 1.
Then go to File > Export > glTF 2.0 2. In the export settings, make sure to
select the following options3:
- Disable
materials- all the materials are now baked into the texture - Disable
animations- since we don't have any animations - Apply
modifiers- this will apply all the modifiers to the model (although this should not be necessary since we already applied all the modifiers) - Select
UVs- this is required for our baked texture to be mapped properly.


As you can see, we've managed to reduce the size of the model from over 8MB to just 1.1MB. Even more size reduction is possible with more thorough optimization and additional compression, which we will not cover here.
Bellow you can find all the files we've created in this tutorial:
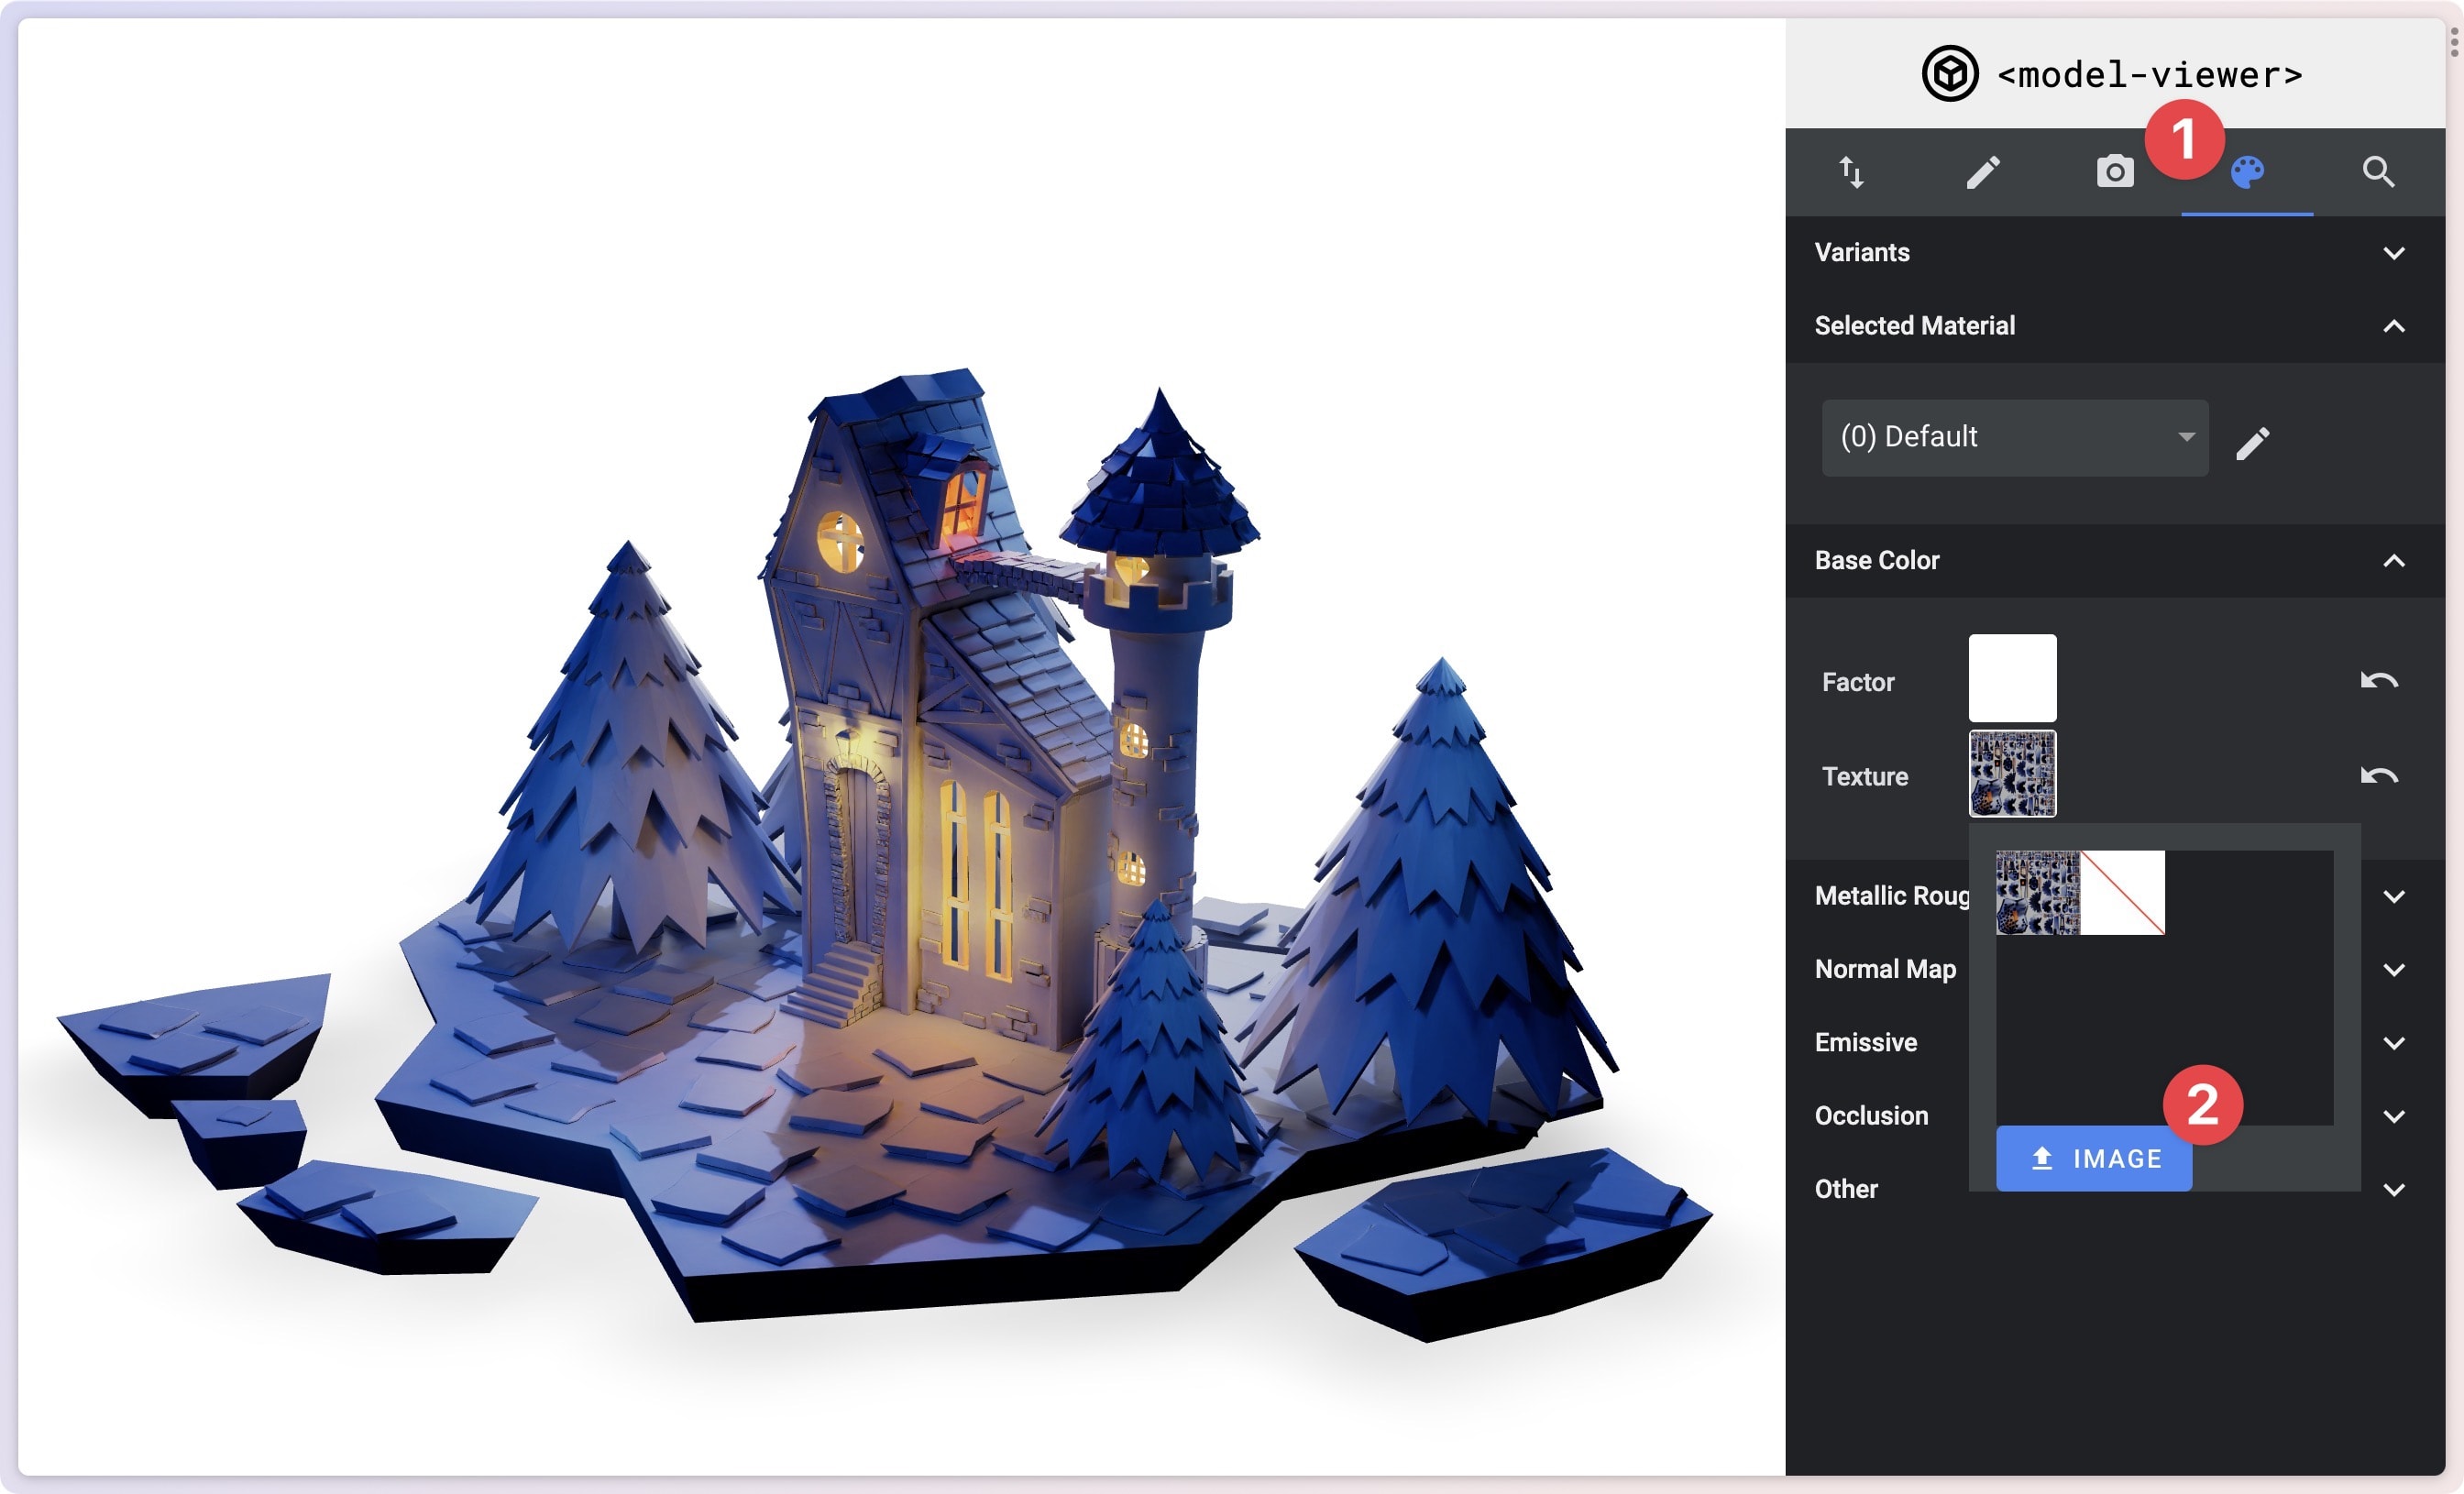
Testing the exported model
In the next part, we'll put the exported model into a Three.js scene in a react app. But before that, let's test the model in modelviewer.dev. Upload your gltf file there by dragging and dropping it into the editor. Go to the materials tab 1, then upload our texture 2
Conclusion
In this guide, we took significant strides towards understanding the process of preparing a 3D model for web use. We successfully reduced a model's size to just 1.1MB, learning key techniques such as optimizing the model, decreasing polygon numbers, and baking textures.
However, it's important to note that this is just an introduction to a much broader topic. The world of 3D model optimization is vast and has a multitude of other methods that can be used to further enhance efficiency and performance. What we've covered here is the tip of the iceberg, a basic overview to get us started.
Excitingly, in the next section, we're going to bring our work to life by loading the optimized model into a React app. This upcoming segment will allow us to see our efforts in action and further appreciate the benefits of a well-optimized 3D model.
Finally, I'd love to hear from you. Please feel free to share your feedback or any thoughts on this guide. And if you found it helpful, do consider sharing it with others who might also benefit.